Friday, June 28, 2013

Core'dinations and Couture Creations Blog Hop


Welcome to Day 5 of the Couture Creations & Core’dinations Color Core Cardstock Blog Hop! 

We’re so excited to team up with Core’dinations Color Core Cardstock to share some inspiring projects with you this week, marrying our products together.
 
 
Hi it's Patti I wanted to take this opportunity to create a page with our beautiful new Granddaughter who was born June 12!!! She is absolutely precious and the Pastel Core'dinations papers were perfect for a baby girl layout!

This is my finished project, I used lots of Couture Creations and Core'dinations on this. I think this photo is just so sweet and I wanted to keep the focus on the photo itself.


I started out by cutting four 5.5 inch squares of the pastel cardstock. I used the Hyper Magical embossing folder on each one. I placed them for my background and "faux" stitched around them with my Zig markers. I die-cut scallop squares using the second and third largest size. I used the Glitter cardstock for the smaller and a coordinating color of the 6x6 cardstock. I outlined them with my Zig markers. I then placed them on the page leaving space for a 4x6 photo. I used different embellishments on each square. I used a die-cut dragonfly on the yellow and blue, then used buttons and punched blooms. The leaves were cut from a scrap of the Hyper Magical embossed cardstock that was left over.

Here is a close-up of the title. I just used chipboard pieces and 5 punched blooms with Glitzin' Glamour in matching colors for the centers.


Here is a close-up where you see a punched bloom and also some of the embossing.


Here you can see the different embossed layers and the little bloom and dragonfly. It all layers together beautifully.


I took one of the smaller Pastel Core-dination Tags and wrote the basic information on it. I used a couple of pieces of Couture Creations foam tape to give it some dimension.


Here is another detail of some of the embellishments I used, this is a piece of the embossed folder cut out.


Here is one where I used a button and twine!!!


One more close-up showing another button, part of the tag and some detail of the embossing. I love the look of the coordinating colors of Glitter and regular cardstock.


I used Gemstones in matching colors on the bodies of the dragonflies. I just drew the little antennae with my Zig marker.


Here is the title again, the little punched blooms


Couture Creations products used:

Core'dinations products used:


We’ll be giving away a fabulous Couture Creations prize package at the end of the week, so be sure to play along and check back on Sunday to see if you’re the lucky winner!


Here are the different ways you can play along with us –

1.      Like Couture Creations on Facebook 
2.      Share this blog post on your Facebook wall and tell us you did on our
Facebook
3.       Follow our 
Couture Creations Blog
4.      Comment here on our blog or on 
Facebook
5.      Follow Couture Creations on 
Pinterest 
Core’dinations ColorCore Cardstock is also posting projects and giving away prizes, so be sure to check out their Blog and Facebook page, too!


Hop over to the Core’dinations ColorCore Cardstock Blog and see what their Design Team has created using their ColorCore Cardstock and our Couture Creations products! They also have  giveaways, so what are you waiting for – hop over!  oh and don't forget to follow our Design Team Blogs


Cathi O'Neill 

Dana Tatar 


Pam Bray  


Check in again with us tomorrow for more inspiring projects from Couture Creations & Core’dinations ColorCore Cardstock 

Thursday, June 27, 2013

Green Tara Post!!!

It's my day up on the Green Tara blog and I have three projects to share with you, first a Birth Announcement card
and then two layouts. Each one has tons of beautiful Green Tara goodies
 on them! These feature one of my favorite color combos, pink and yellow
with some others mixed in as well. Hope you like them.

"She's Here"

I am so happy to share this post with everyone today!!! We became the
 proud Grandparents of a sweet baby girl June 12th!!! And she is
 precious! I made a super sweet and simple announcement card using
 some pastel colored blooms and trims!

Here you can see the blooms that I used, the pretty yellow Primula, 
white Apple Blossom and tiny pink cherry blossom together.
 I added the Mint/Ivory Bud n Bow trim with some dainty
 20m white lace across the bottom.


I made a pocket/frame for the photo and put a tag with the stats inside,
 I added a little bit of the pink/grey raffia as the trim.


"Adore/Cherish Forever"

I also have two layouts to share with you. These are photos taken
 before the baby was born! This first one was a black and white,
 so I chose colors that would accentuate the pic. I used lighter hues
 to match the colors in the paper that I used. It's a subtle look 
that suits the photo.


Here you see some of the embellishments that I used, the little
cherry blossom was the perfect accent to the cluster of blooms,
 I cut out some hearts from the paper also & added some 
liquid pearls to finish it off.


Here you see the gorgeous Laurel silk and organza bloom,
 the soft yellow was perfect. You also see the Tutu blooms 
and more little cherry blossoms.


I added a pretty black flower spray and 10mm lace ribbon on the edge 
of the photo. I also added a bow made from the
 natural Jute ribbon in ivory.


Just a close up of a few more details where I added their name and date, 
with more little liquid pearl accents.


 I added a pretty little yellow Primula bloom and another cherry blossom!
 The little cherry blossoms are just the perfect size to tuck in anywhere
 you need a little filler!!!


"Cherish"

This is another photo taken before the baby. 
This one was bright and colorful, 
so I chose papers and embellishments to match.
 Lots of pretty pink and green on this one!


I just love the pink and yellow blooms together!!! The pink azalea
 is gorgeous with the little yellow bloom and tiny black roses tucked in!
 I also took some white Petals from the Petal pack and spritzed them 
with some pink spray, cut in half, and tucked them behind.


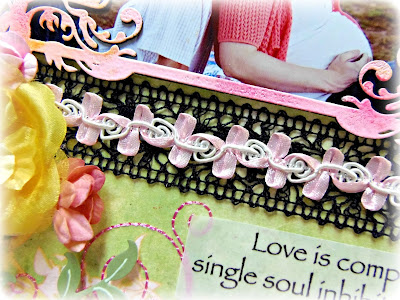
Here you see the pretty pink Bud n Bow trim layered on the black
 lace ribbon. The chippie frame is from Imaginarium Designs.


Here is a close-up of one of the clusters and you see another
 Petal bloom tucked underneath.


Green Tara products used:

"She's Here"
20m white lace RB6807WH
5mm Raffia Pink/Grey RBJPPG
10m Bud n Bow Mint/Ivory RB6771MI
4.5 Silk & Organza Primula Yellow XF9325Y
Cherry Blossom Pink FLC22P

"Cherish/Adore"
8cm Silk & Organza Laurel, Cream/Yellow XF9218CY
 Heirloom 4cm Silk & Organza Yellow XF9317Y
Cherry Blossom Cream FLC22C
Cherry Blossom 2 Tone Sea Green FLC2259
Tutu 5cm  Organza & Pearl Midnight XF9227M
Tutu 5cm Organza & Pearl Turquoise XF9227TU
Flower Spray Black PFSTBL100
15mm Natural Jute Ribbon Ivory RB26NAT15IV
10 mm Lace Ribbon White RB6810WH

"Cherish"
10mm Lace Ribbon Black RB6740BL
10mm Bud n Bow Ivory/Pale Pink
1cm Roses Black FDR001BL
Cherry Blossoms Pale Pink FLC22PP
Cherry Blossoms Pink FLC22P
7cm Petals white 021WH
Heirloom 6.5cm Silk & Organza Yellow XF9213Y
Heirloom 4cm Silk & Organza Yellow XF9317Y
5cm Azalea Pink FLA100

I just love the variety that Green Tara has, you can find something that 
fits your project and makes the entire thing go to extraordinary!!!! 
Thanks so much for stopping by and please come back!!!

Tuesday, June 18, 2013

Craft-Dee Bowz Wedding Layout

Today is my day on the Craft-Dee Bowz blog! This is our daughter on her wedding day. I focused this black and white photo on the beautiful offwhite and burnt orange ribbons. I used my Craft-Dee Bowz tool and made a triple loop bow with the wide sheer ribbon, then made a single loop with the burnt orange and layered it on top and pinned it with a pretty stick pin!


Here is a close-up of the beautiful ribbon and the bow, also the lace border. You can see the little stick pin accent as well.


Here you see the beautiful strip that I embossed with the 12" embossing folder by Darice. I then inked it white and used lavendar and gold stickles along with gems and pearl accents.


Here you can see the beautiful Prima blooms and butterfly that matched perfectly with the ribbons. I was lucky and found some old Cosmo Cricket Love Letters paper in my stash!!! The colors were just right!
The journaling is rub-ons from Kaisercraft. I love the colors together and I think it shows well with the b/w photo. The Craft-Dee Bowz tool makes it easy to create gorgeous multi-loop bows and layer them if you want to!


Thanks so much for stopping by. I hope you will create and play with your Craft-Dee Bowz tool, and if you don't have one, what are you waiting for?!?!?!?!!!!!

Monday, June 3, 2013

June Challenge at OnceUponASketch!!!

It's time once again for a new sketch at Once Upon A Sketch. Nadia has been super busy with a new baby and has still kept everything running like a well oiled machine!!!! Congrats to her and her beautiful family!

Now..... here is this months challenge which you have until midnight June 25th (Australian Eastern Standard Time) to enter. Hope you have fun with it :)


Theme: What's your guilty pleasure?

Oh yes! We all get some sort of pleasure from something we really shouldn't. What's yours? 

Ideas for journalling: scrapping, time alone, food, going to a concert, a T.V show, time in the garden, playing , Facebook, your iphone, shopping, bags, shoes, computer time, designing, creating etc etc


Your layout must incorporate this theme and the sketch below. 

Please make sure that we see some sort of journalling on your layouts and please tell us where your journalling is . You are allowed to journal in any language but please tell us where on your page we will find your journalling. Remember journalling has to be a bit more than a title, or a generic comment. Hidden journalling is perfectly fine.


Here is my project. The theme is guilty pleasure. I have watched "The Young and the Restless" since I was a kid. Now I try not to miss it, I have other things that should be done, but I have to watch!! LOL! I apologize for the bad photos, my camera battery was dead, these were taken with my phone!


I used some old Basic grey paper and some miscellaneous blooms and bling! The scallop border around the journaling is a Couture Creations nesting die!


The alpha chippies are from Imaginarium Designs. I added some little liquid pearl accents and also some Crystal Accents too.


The little butterfly is also Imaginarium Designs. I just added some little gems for the body!


I hope you have time to join us for this challenge, and please check out the website for the beautiful creations by the rest of the design team. Thanks so much for stopping by!!!!!